
Waterproofing Contractors in Thane: Complete Guide Before Home Renovation
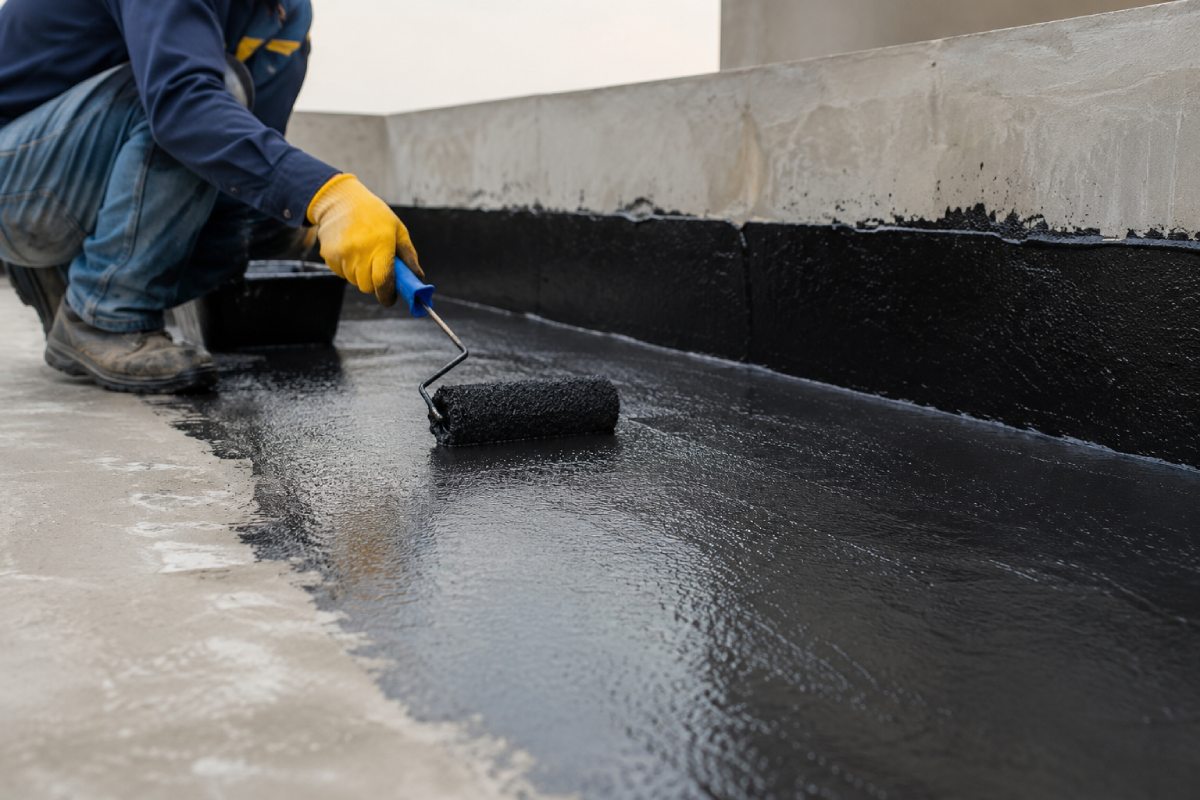
Introduction: Why Waterproofing Is the Most Important Work You Never See
When homeowners renovate their homes, most of their attention naturally goes toward visible improvements. They spend weeks choosing elegant floor tiles, modular kitchens, premium wardrobes, designer lighting, false ceilings, textured paint finishes, and luxurious bathroom fittings. Every decision is carefully evaluated because these are the elements that everyone notices after the renovation is complete.
However, the most important investment in the entire project is usually hidden beneath those beautiful finishes. That investment is waterproofing. Unlike flooring or furniture, waterproofing is never visible after the project is completed. It is covered by tiles, plaster, paint, ceilings, or other interior finishes. Because homeowners cannot see it every day, they often underestimate its importance or assume it can be postponed until later. Unfortunately, waterproofing is one of the few renovation activities that cannot be corrected easily after interior work is complete.
If waterproofing fails after expensive interiors have been installed, the damage is rarely limited to one area.
- Moisture begins travelling through walls, ceilings, concrete, and flooring.
- Paint starts bubbling.
- Plaster begins deteriorating.
- Wooden wardrobes swell.
- False ceilings develop stains.
- Electrical fittings become vulnerable to moisture.
- Bathrooms begin leaking into lower floors.
- Terraces allow rainwater to penetrate concrete slabs.
What initially appears to be a small damp patch can eventually require breaking newly installed tiles, removing expensive furniture, dismantling modular kitchens, or reconstructing finished interiors. This is why experienced waterproofing contractors in Thane often describe waterproofing as an investment that protects every other investment made during renovation.
Across Thane, Thane West, Ghodbunder Road, Hiranandani Estate, Majiwada, Balkum, Kasarvadavali, Wagle Estate, and surrounding areas, homeowners frequently renovate apartments that are between five and twenty years old. Many of these properties have hidden waterproofing failures that are not immediately visible during a casual inspection. Some buildings show early warning signs. Others appear perfectly dry until the first heavy monsoon.
Professional waterproofing inspection helps identify these risks before interior work begins. Instead of repairing damage later, contractors eliminate the source of moisture first. That approach not only protects the structure but also increases the lifespan of flooring, paint, ceilings, furniture, electrical systems, and decorative finishes. Homeowners searching for waterproofing services near me can benefit from scheduling a professional inspection before starting any renovation project.
This guide has been created to explain the complete waterproofing process before home renovation. Instead of focusing only on waterproofing chemicals or contractor selection, it covers the entire decision-making framework homeowners need before starting interior work
You will learn:
- Why waterproofing is essential before interiors
- How water damages buildings over time
- Which areas require waterproofing
- Signs that waterproofing has already failed
- Terrace, bathroom, basement, and external wall waterproofing
- Waterproofing chemicals and systems
- Inspection methods
- Cost factors
- Project timelines
- Choosing the right contractor
- Warranty considerations
- Common mistakes homeowners should avoid
Whether you are renovating a 1 BHK apartment, 2 BHK flat, 3 BHK home, villa, bungalow, office, commercial building, or residential society, this guide will help you understand how proper waterproofing protects both your property and your renovation budget.
Quick Answer: What Is Waterproofing?
Waterproofing is the process of protecting a building from water penetration by applying specialized systems that prevent moisture from entering concrete, masonry, walls, floors, terraces, bathrooms, basements, and roofs. Professional waterproofing contractors inspect vulnerable areas, identify the source of leakage, select suitable waterproofing materials, and apply the correct treatment before interior work begins to protect the building and improve its long-term durability.
Why Waterproofing Is the Most Important Stage Before Interior Work
Many homeowners believe waterproofing is necessary only after leakage appears. This misunderstanding often results in expensive repairs that could have been avoided with proper planning. Professional waterproofing contractors approach renovation differently. Instead of waiting for visible damage, they focus on preventing water from entering the building in the first place.
Waterproofing is not simply a repair activity. It is a preventive protection system. Once completed correctly, it safeguards every interior finish installed afterward. Without this protection, even premium materials cannot perform as expected.
Waterproofing Protects Much More Than Walls
Most people associate waterproofing only with damp walls. In reality, moisture affects almost every component of a home. When water enters concrete or masonry, it gradually spreads through connected building materials.
This movement often damages:
- Interior paint
- Plaster
- Flooring
- Wooden furniture
- Wardrobes
- Modular kitchens
- False ceilings
- Electrical conduits
- Decorative wall finishes
The visible stain is often only the final symptom of a much larger hidden problem.
Waterproofing Reduces Long-Term Maintenance Costs
One of the biggest advantages of professional waterproofing is that it minimizes recurring maintenance. Instead of repeatedly repairing paint, plaster, and ceilings every monsoon, homeowners address the source of the problem permanently.
Although waterproofing requires an initial investment, it often prevents significantly larger expenses later. Replacing damaged furniture, flooring, and ceilings usually costs far more than proper waterproofing completed during renovation. If you are looking for waterproofing near me, choosing preventive treatment before interiors are completed can help avoid expensive future repairs.
Waterproofing Increases the Lifespan of Interior Work
Every interior project depends on a stable, dry building envelope.
When walls remain dry:
- paint lasts longer
- tiles remain bonded
- wooden furniture stays stable
- laminate edges do not swell
- false ceilings remain clean
- decorative finishes maintain their appearance
This is why waterproofing is considered one of the most important preparation stages before interior execution.
What Is Waterproofing? Understanding How Buildings Actually Leak
Many homeowners imagine waterproofing as simply applying a chemical coating on a surface. Professional waterproofing is much more complex. It combines engineering, material science, surface preparation, moisture control, and chemical protection to prevent water from entering building components. To understand why waterproofing is necessary, it is first important to understand how buildings actually leak.
Contrary to popular belief, water does not always enter through visible cracks. Concrete itself is naturally porous. Even apparently solid walls contain microscopic capillaries through which moisture can slowly travel. Rainwater, groundwater, plumbing leaks, and condensation all exploit these pathways. Over time, repeated moisture exposure weakens construction materials and creates visible damage. Professional waterproofing blocks these pathways before moisture reaches finished surfaces.
How Water Enters a Building
Water commonly enters through:
- Surface cracks
- Construction joints
- Expansion joints
- Damaged grout
- Pipe penetrations
- Roof surfaces
- External walls
- Bathroom floors
- Balcony slabs
Once inside, moisture spreads through concrete and masonry before becoming visible. This is why leakage often appears far away from its original source.
Capillary Action: Why Dampness Travels Through Walls
One of the least understood causes of moisture damage is capillary action. Concrete, brickwork, and plaster contain microscopic pores. These tiny passages allow water to move upward and sideways even without direct pressure.
As a result:
- A terrace leak may appear on a ceiling below.
- Bathroom leakage may damage adjacent bedrooms.
- External wall seepage may become visible inside living rooms.
- Basement moisture may travel upward through walls.
Simply repairing the visible stain rarely solves the actual problem. The source must first be identified.
Contractor Insight
Professional waterproofing begins with diagnosis, not chemical application. Experienced contractors spend considerable time identifying the actual path of water movement before recommending any treatment. Applying the wrong waterproofing system without understanding the source often leads to repeated leakage despite multiple repair attempts.
How Water Damages a Home Over Time
Water damage rarely occurs overnight. Most leakage problems develop gradually. Small amounts of moisture enter the structure repeatedly until the accumulated damage finally becomes visible. Because this process is slow, homeowners often ignore early warning signs.
Unfortunately, the longer moisture remains inside a building, the more extensive the repairs become. Understanding how water affects different building components helps homeowners appreciate why early waterproofing is so valuable.
Damage to Structural Concrete
Concrete appears strong, but prolonged moisture exposure can gradually affect its durability. Water entering through cracks may eventually reach reinforcement steel. This increases the risk of corrosion. As steel corrodes, it expands.
That expansion places pressure on surrounding concrete, eventually causing:
- Cracks
- Spalling
- Surface deterioration
- Structural weakening
Although severe structural damage is relatively uncommon in residential apartments, early waterproofing significantly reduces this risk.
Damage to Plaster and Paint
This is the most common symptom homeowners notice. Moisture trapped inside walls gradually pushes paint away from the surface.
Typical signs include:
- Bubbling paint
- Flaking paint
- Damp patches
- Salt deposits
- Discoloration
- Peeling plaster
These cosmetic defects usually indicate that moisture is already present inside the wall.
Damage to Wooden Furniture
Wood-based products are particularly sensitive to moisture.
Water exposure may cause:
- Swelling
- Laminate lifting
- Edge expansion
- Warping
- Fungal growth
Premium modular kitchens and wardrobes can suffer extensive damage if waterproofing problems are ignored.
Damage to Flooring
Moisture beneath flooring may eventually lead to:
- Hollow tiles
- Loose flooring
- Cracked grout
- Water seepage
- Adhesive failure
Repairing these issues generally requires removing finished flooring.
Damage to Indoor Air Quality
Waterproofing is not only about protecting buildings. It also affects the health of the people living inside them.
Persistent dampness encourages:
- Mold growth
- Mildew
- Fungus
- Musty odours
- Poor indoor air quality
For children, elderly family members, and individuals with respiratory conditions, prolonged exposure to damp indoor environments can create additional health concerns.
Where Waterproofing Is Required in a Home
Many homeowners believe waterproofing is only necessary for bathrooms. Professional inspection reveals that several parts of a building require moisture protection. Each area experiences different exposure conditions and therefore requires different waterproofing systems. The treatment used for a terrace may not be suitable for a basement. Similarly, bathroom waterproofing differs from external wall protection. Understanding these differences helps homeowners make informed decisions before renovation begins.
Terrace Waterproofing
Terraces receive continuous exposure to:
- rainwater
- UV radiation
- temperature changes
- ponding water
- expansion and contraction
Without proper terrace waterproofing, water gradually penetrates the slab and affects ceilings below.
Bathroom Waterproofing
Bathrooms remain wet almost every day.
Moisture exposure occurs through:
- shower areas
- floor joints
- pipe penetrations
- drainage systems
Professional bathroom waterproofing protects adjoining rooms and lower floors from leakage.
Balcony Waterproofing
Balconies combine weather exposure with structural movement.
Proper waterproofing protects:
- slabs
- wall junctions
- drain outlets
- tile bedding
Kitchen Wet Areas
Although kitchens are not constantly wet, sink areas, plumbing lines, and appliance connections benefit from localized waterproof protection.
External Walls
Rainwater often enters through external walls during heavy monsoons. Protective waterproofing systems reduce moisture penetration while preserving exterior finishes.
Basement Waterproofing
Basements face continuous groundwater pressure. Professional waterproofing systems protect underground walls and floors from long-term seepage.
Roof Waterproofing
Flat roofs experience some of the harshest environmental conditions. Professional roof waterproofing services help prevent leakage caused by rainwater accumulation, cracks, and thermal expansion.
20 Signs Waterproofing Has Failed
One of the biggest misconceptions homeowners have is believing that waterproofing problems always involve visible water leakage. In reality, most waterproofing failures begin silently. Water enters through microscopic cracks, damaged joints, porous concrete, or failed waterproof membranes. It gradually moves through the structure before finally becoming visible.
By the time stains appear on walls or ceilings, moisture has often been present inside the building for several weeks or even months. Recognizing these early warning signs allows repairs to be completed before major reconstruction becomes necessary. Below are the most common indicators that professional waterproofing inspection is required.
1. Bubbling Paint
Paint bubbles occur when moisture becomes trapped behind the painted surface. As water evaporates, pressure builds beneath the paint film. Eventually, the paint loses adhesion and begins lifting away from the wall.
What Causes It?
- Moisture inside walls
- external wall seepage
- bathroom leakage
- roof leakage
- poor waterproofing
Why It Should Not Be Ignored
Many homeowners simply repaint the wall. Unfortunately, repainting only hides the symptom. The trapped moisture continues damaging the wall underneath.
2. Peeling Paint
Peeling paint usually indicates long-term moisture exposure. Unlike bubbling, peeling often develops after repeated wet and dry cycles.The paint gradually loses its bond with the plaster.
Common causes:
- damp masonry
- terrace seepage
- bathroom waterproofing failure
- external wall leakage
Professional inspection identifies the actual source before repainting begins.
3. Damp Patches on Walls
Damp patches are one of the earliest visible signs of moisture migration. Initially, they may appear as slightly darker areas. Over time they expand and become more noticeable.
Typical locations:
- bedroom walls beside bathrooms
- living room external walls
- ceiling corners
- staircase walls
Damp patches almost always indicate active moisture movement.
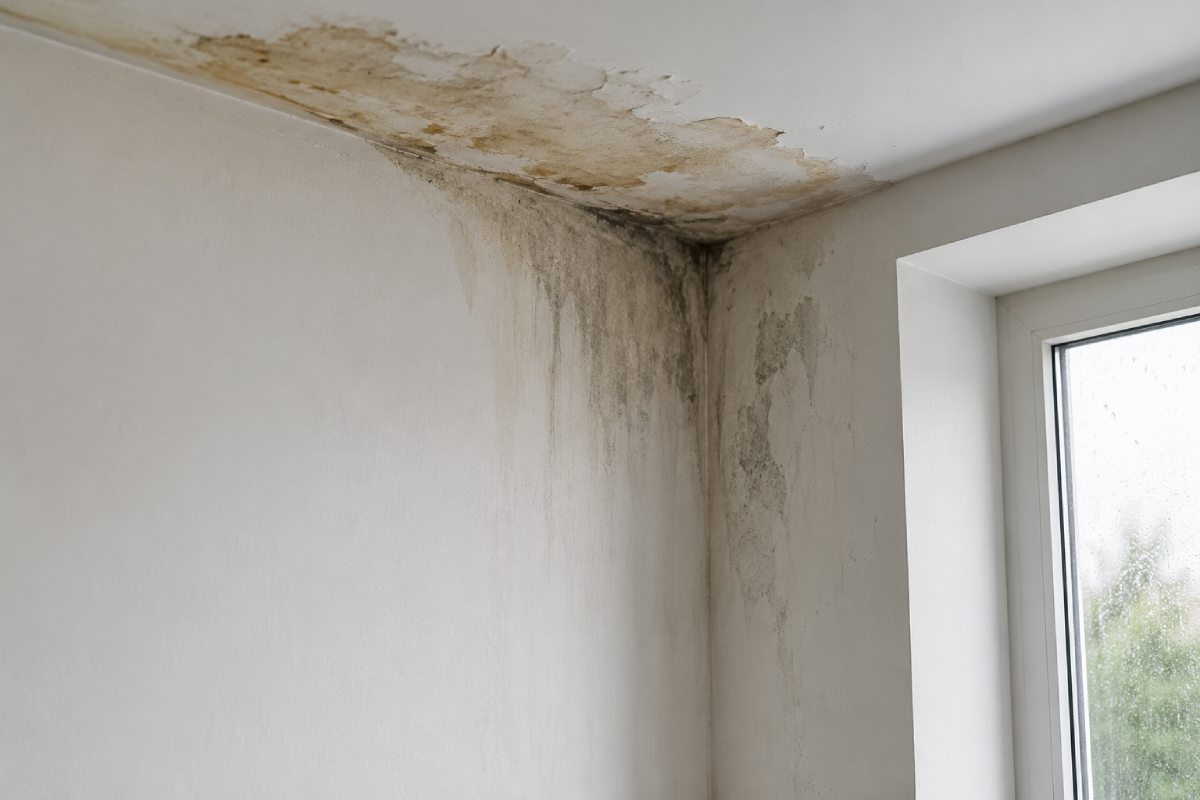
4. Ceiling Water Stains
Brown or yellow ceiling stains often indicate leakage from above.
Possible sources include:
- terrace waterproofing failure
- bathroom leakage
- plumbing leakage
- roof cracks
Professional contractors inspect the slab above before recommending repairs.
5. White Salt Deposits (Efflorescence)
White powdery deposits on walls indicate moisture carrying dissolved salts through concrete or plaster. As the water evaporates, salt remains on the surface.
Why It Matters?
- Efflorescence confirms ongoing moisture movement.
- Cleaning the deposits without addressing the source will not solve the problem.
6. Musty Odour Inside the House
Persistent damp smells usually indicate hidden moisture.
Even if no stains are visible, water may already be trapped inside:
- false ceilings
- wardrobes
- wall cavities
- flooring
This often requires professional moisture inspection.
7. Mold Growth
Mold develops when moisture remains present for extended periods.
Common locations include:
- bathroom ceilings
- wardrobe backs
- bedroom corners
- window edges
- utility rooms
Apart from damaging finishes, mold can negatively affect indoor air quality.
8. Mildew on Walls
Unlike mold, mildew generally appears as grey or white surface growth. Although easier to clean, it still indicates excessive moisture. Ignoring mildew often allows deeper fungal growth to develop later.
9. Cracked Waterproof Coating on Terrace
Terrace waterproof coatings naturally expand and contract due to temperature changes. Over time, cracks may appear, allowing rainwater to penetrate the slab below. Regular terrace inspections help detect coating failures before leakage occurs.
10. Standing Water on Terrace
Water should drain completely after rainfall. If puddles remain for long periods, the terrace slope may be inadequate, placing continuous pressure on waterproof membranes and significantly increases leakage risk.
11. Loose Floor Tiles
Water entering beneath tiles gradually weakens the adhesive layer. Eventually, tiles begin sounding hollow or become loose, indicating waterproofing failure below the finished flooring.
12. Cracked Tile Grout
Although grout itself is not waterproof, damaged grout allows water to penetrate below the tiles. Professional contractors inspect grout conditions carefully during bathroom assessments.
13. Swollen Wooden Furniture
Wood absorbs moisture quickly.
Typical signs include:
- swollen laminate
- lifted edges
- warped doors
- difficult drawer movement
Furniture damage often indicates hidden wall moisture.
14. Rust Marks on Walls
Rust stains frequently develop when moisture reaches reinforcement steel or metal components inside walls. Professional inspection is recommended before corrosion progresses further.
15. Damp Wardrobes
Wardrobes placed against external or bathroom walls frequently reveal hidden waterproofing failures.
Signs include:
- musty smell
- mold
- swollen laminate
- damp clothing
Removing furniture often reveals concealed moisture damage.
16. Water Seepage After Heavy Rain
If leakage occurs only during monsoon, the problem often originates from:
- terraces
- parapet walls
- external walls
- roof joints
Rain-dependent leakage requires inspection during or immediately after rainfall whenever possible.
17. Cracks Around Window Frames
Improper sealing around windows allows rainwater to enter.
Professional inspection evaluates:
- silicone joints
- plaster condition
- frame alignment
- drainage details
18. Basement Dampness
Persistent basement moisture usually indicates hydrostatic water pressure. Unlike terrace leakage, basement waterproofing requires specialized systems designed for below-ground conditions.
19. Ceiling Leakage Below Bathrooms
Water stains below bathrooms often indicate failed bathroom waterproofing rather than plumbing leakage. Correct diagnosis prevents unnecessary plumbing replacement.
20. Recurring Repairs Every Monsoon
One of the clearest indicators of waterproofing failure is repeated annual repairs. If the same wall requires repainting every rainy season, the moisture source has never been eliminated. Professional waterproofing addresses the cause — not just the visible damage.
Real Terrace Waterproofing Inspection Checklist
Terraces are among the most exposed parts of any building.
They experience:
- intense sunlight
- heavy rainfall
- temperature fluctuations
- expansion and contraction
- standing water
Over time, these conditions gradually weaken waterproofing systems. Professional roof waterproofing services near me in Thane begin with a detailed inspection before recommending repairs. Rather than immediately applying new chemicals, contractors first evaluate the condition of the existing surface.
Surface Crack Inspection
The first step is identifying visible cracks.
Inspectors evaluate:
- hairline cracks
- structural cracks
- corner cracks
- parapet junctions
- expansion joints
Each crack behaves differently and requires a specific repair method.
Slope Verification
Proper drainage is one of the most important elements of terrace waterproofing.
Contractors check:
- water flow direction
- ponding locations
- low spots
- drain alignment
Poor slope often causes waterproofing systems to fail prematurely.
Drain Outlet Inspection
Blocked or damaged drain outlets allow water to accumulate.
Inspection includes:
- outlet condition
- blockage
- joint sealing
- water discharge
Even high-quality waterproofing cannot perform properly if drainage is inadequate.
Existing Waterproof Layer Assessment
Professional inspectors evaluate:
- coating adhesion
- blistering, peeling
- UV damage
- membrane condition
This helps determine whether repairs are possible or complete replacement is required.
Contractor Insight
One of the biggest mistakes homeowners make is applying a new waterproof coating over an existing damaged system. If the underlying layer has already failed, simply covering it rarely provides a long-term solution. Professional inspection determines whether localized repairs are sufficient or whether complete re-waterproofing is necessary.
Bathroom Leakage Inspection
Bathrooms remain one of the most common sources of hidden leakage. Unlike terrace leakage, bathroom waterproofing failures often remain unnoticed because moisture spreads beneath floor tiles before becoming visible elsewhere.
By the time the ceiling below begins showing stains, water may already have been travelling beneath the bathroom floor for several months. Professional inspection focuses on identifying the actual leakage path rather than replacing random fixtures.
Areas Inspected During Bathroom Assessment
Floor Joints
Checking:
- cracked grout
- tile movement
- loose flooring
Wall Junctions
Inspecting:
- floor-wall joints
- shower corners
- waterproof seals
Pipe Penetrations
Evaluating:
- inlet pipes
- drain outlets
- concealed plumbing
- waterproof collars
Shower Areas
Inspecting:
- waterproof membrane continuity
- tile adhesion
- floor slope
- water drainage
Flood Testing
Where appropriate, contractors may perform controlled flood testing to verify whether the waterproofing system is functioning correctly before recommending repairs.
Roof Leakage Inspection
Roof leakage rarely develops from one large opening. It usually results from multiple small defects working together.
Professional inspections evaluate:
- concrete cracks
- waterproof coating
- expansion joints
- drain outlets
- parapet connections
- flashing details
- previous repair areas
This systematic approach produces much more reliable repairs than treating only the visible leakage point.
External Wall Waterproofing Inspection
External walls face continuous exposure to rain and weather.
Professional inspections include:
- wall cracks
- paint condition
- plaster adhesion
- window sealing
- façade joints
- pipe penetrations
Because rainwater often travels behind plaster before entering the home, visible dampness may appear far from the original entry point.
Basement Waterproofing Inspection
Basements require specialized inspection because they experience constant groundwater pressure.
Professional assessment includes:
- wall moisture
- floor seepage
- construction joints
- expansion joints
- drainage systems
- foundation cracks
Unlike above-ground waterproofing, basement systems must resist water pressure continuously.
Before Waterproofing vs After Waterproofing
| Before Waterproofing | After Professional Waterproofing |
|---|---|
| Damp walls | Dry surfaces |
| Bubbling paint | Long-lasting paint finish |
| Mold growth | Improved indoor air quality |
| Water seepage | Moisture protection |
| Frequent repairs | Lower maintenance costs |
| Damaged furniture | Protected interiors |
| Ceiling stains | Clean ceilings |
| Monsoon leakage | Better weather resistance |
Why Most Waterproofing Problems Are Misdiagnosed
Many homeowners immediately blame visible symptoms.
For example:
- Ceiling stain → roof leak
- Bedroom dampness → external wall
- Bathroom leakage → plumbing
However, water rarely travels in a straight line. Moisture may originate several metres away from the location where it becomes visible. This is why professional waterproofing contractors near me focus on diagnosis before recommending repairs. Correct diagnosis prevents unnecessary expenses and ensures that the chosen waterproofing system addresses the actual source of the problem rather than simply hiding its symptoms.
Terrace Waterproofing Solutions
Among all areas of a residential building, terraces experience the highest exposure to environmental stress.
Unlike interior spaces, terraces remain exposed to:
- heavy rainfall
- direct sunlight
- UV radiation
- extreme summer temperatures
- continuous expansion and contraction
- standing rainwater
- wind-driven moisture
These conditions gradually weaken even good-quality construction. Without a properly designed waterproofing system, water slowly penetrates the concrete slab and begins affecting the ceiling below.
Unfortunately, many homeowners notice the problem only after damp patches appear inside their living room or bedroom. By then, water has already travelled through the structure. Professional terrace waterproofing near me in thane focuses on preventing water from entering the slab in the first place.
Why Terrace Waterproofing Fails
Terrace leakage rarely develops because of one large crack. It usually results from multiple small failures developing over several years.
Common causes include:
- Hairline cracks in concrete
- Damaged waterproof coatings
- Improper surface slope
- Blocked drainage outlets
- Expansion joint failure
- Poor workmanship during previous repairs
- Ageing waterproof membranes
Even a small defect can allow thousands of litres of rainwater to penetrate during a single monsoon season.
Professional Terrace Waterproofing Process
Experienced waterproofing contractors follow a structured execution process instead of simply applying a chemical coating.
Step 1: Detailed Surface Inspection
The terrace is inspected for:
- surface cracks
- structural movement
- existing coating condition
- drainage efficiency
- ponding water
- parapet wall junctions
This inspection determines whether localized repair is sufficient or complete waterproofing is required.
Step 2: Surface Preparation
Surface preparation is one of the most critical stages.
The contractor removes:
- loose concrete
- dust
- existing failed coatings
- contaminants
- algae
- moss
Any damaged concrete is repaired before waterproofing begins. A waterproof membrane performs only as well as the surface beneath it.
Step 3: Crack Treatment
Visible cracks are repaired using suitable repair compounds before the waterproofing system is applied. Ignoring cracks allows water to bypass the waterproof layer.
Step 4: Waterproof Membrane Application
Depending on site conditions, contractors may recommend:
- acrylic coatings
- polyurethane systems
- cementitious coating
- APP membranes
- SBS membranes
Each system is selected based on:
- exposure conditions
- terrace usage
- existing surface
- expected lifespan
- budget
Step 5: Flood Testing
Before finishing work begins, the terrace is tested by retaining water for a specified period. Flood testing verifies that the waterproofing system performs correctly before additional layers are installed.
Benefits of Proper Terrace Waterproofing
Professional terrace waterproofing provides long-term protection by:
- Preventing rainwater penetration
- Protecting reinforced concrete
- Reducing ceiling leakage
- Extending building life
- Protecting interior finishes
- Lowering future maintenance costs
Choosing experienced waterproofing services near me helps ensure terrace waterproofing is completed using the right materials and application methods.
Bathroom Waterproofing: Protecting the Most Frequently Wet Area in the Home
Bathrooms remain exposed to moisture every single day. Unlike terraces, which experience seasonal rainfall, bathrooms are subjected to continuous water exposure from showers, washbasins, floor cleaning, and plumbing fixtures. Because tiles cover the floor, many homeowners assume they provide waterproof protection.
This is one of the biggest misconceptions in residential construction. Tiles are decorative finishes. They are not waterproof barriers. Water gradually penetrates through grout joints, movement joints, and microscopic openings. Without a proper waterproof membrane beneath the tiles, moisture eventually reaches the slab.
This often results in:
- Ceiling leakage
- Damp bedroom walls
- Mold growth
- Tile debonding
- Damage to neighbouring apartments
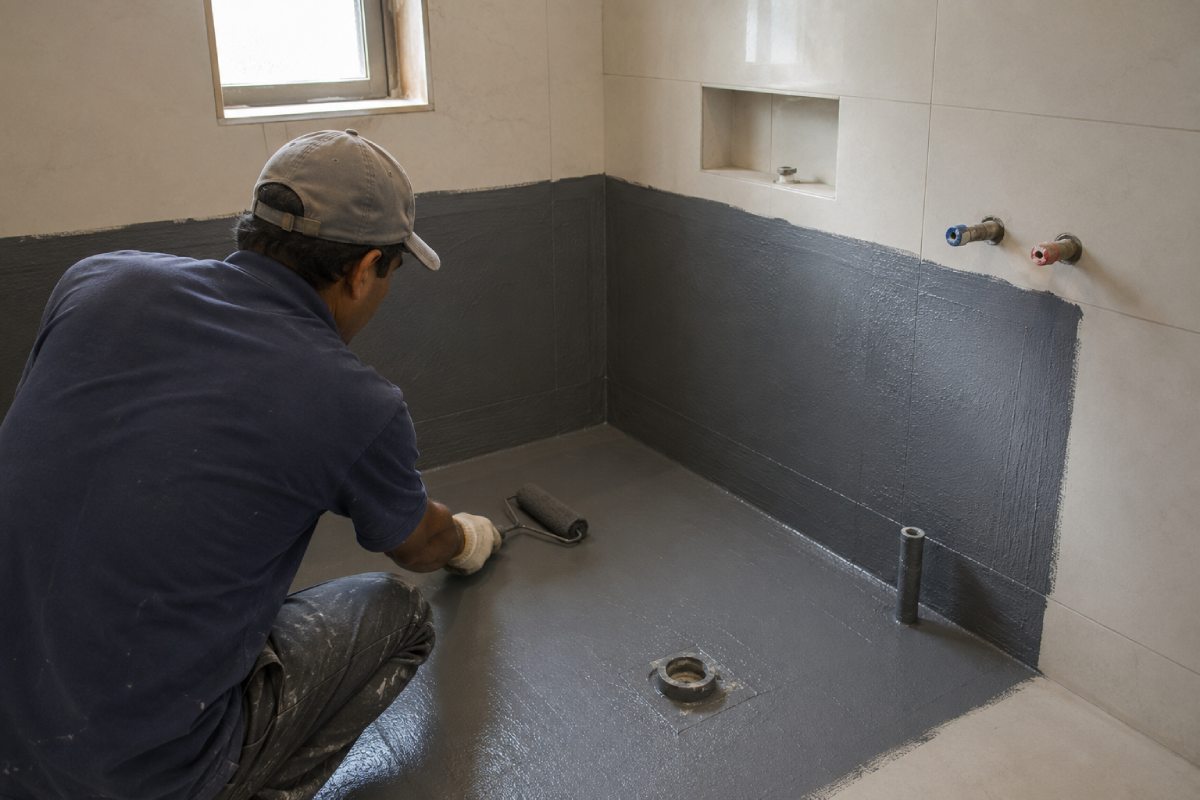
Professional Bathroom Waterproofing Process
Surface Preparation
- Before applying waterproofing materials, contractors prepare the substrate by removing dust, loose mortar, oil, and contaminants.
- The surface must be structurally sound and clean.
Corner Reinforcement
- Wall-floor junctions experience the highest movement.
- Flexible reinforcement materials are installed at these critical locations.
Waterproof Membrane Application
The waterproofing system is applied across:
- the entire floor
- wall junctions
- shower areas
- pipe penetrations
In many cases, waterproofing extends several feet up the wall, particularly within shower zones.
Flood Testing
Professional contractors perform flood testing before tile installation. Water is retained for an extended period to verify that no leakage occurs below. Only after successful testing are tiles installed.
Why Bathroom Waterproofing Should Never Be Skipped
Skipping waterproofing may initially reduce project costs.
However, repairing a leaking bathroom later often requires:
- removing floor tiles
- breaking wall tiles
- damaging finished interiors
- replacing waterproof membranes
- reinstalling finishes
Completing waterproofing correctly during renovation is considerably more economical.
External Wall Waterproofing
External walls form the first barrier against rainwater. During heavy monsoon seasons, these walls experience continuous exposure to moisture driven by wind and rainfall. Small cracks that appear harmless during dry weather may allow significant water penetration during storms.
Once moisture enters the wall, it often becomes visible inside bedrooms and living rooms several weeks later. Professional external wall waterproofing protects both the building envelope and interior finishes.
Common Causes of External Wall Leakage
Water commonly enters through:
- Hairline cracks
- Damaged plaster
- Window joints
- Pipe penetrations
- Construction joints
- Weathered exterior paint
Each entry point requires a different repair strategy.
Waterproofing Methods
Depending on the condition of the façade, contractors may recommend:
- Crack injection
- Elastomeric coatings
- Acrylic waterproof coatings
- Cementitious systems
- Protective exterior paints
The selection depends on wall condition, building age, and environmental exposure.
Basement Waterproofing
Basements experience one of the most challenging waterproofing environments. Unlike terraces, where water falls from above, basements face constant hydrostatic pressure from surrounding soil. Groundwater continuously pushes against basement walls and floors.
If waterproofing systems fail, water gradually enters through:
- Construction joints
- Foundation cracks
- Wall-floor junctions
- Pipe penetrations
Because hydrostatic pressure remains constant, basement waterproofing requires specialized treatment systems.
Typical Basement Waterproofing Process
Professional contractors evaluate:
- groundwater pressure
- structural condition
- drainage systems
- existing membranes
- concrete quality
Treatment may include:
- Cementitious waterproofing
- Crystalline waterproofing
- Injection grouting
- Drainage membranes
- External waterproof barriers
Each project requires engineering evaluation rather than standard coating application.
Roof Waterproofing Services
Although many homeowners use the terms roof waterproofing and terrace waterproofing interchangeably, different roof types require different treatment methods. Flat concrete roofs, sloped roofs, metal roofing systems, and tiled roofs each present unique waterproofing challenges. Professional roof waterproofing services begin with understanding the roof construction before recommending a suitable waterproofing solution.
Flat Concrete Roofs
Typically require:
- Crack treatment
- Waterproof membrane
- UV-resistant coating
- Drainage improvements
Sloped Roofs
Inspection focuses on:
- Tile movement
- Ridge joints
- Flashing
- Water channels
Metal Roofs
Professional waterproofing addresses:
- Fastener sealing
- Joint treatment
- Corrosion protection
- Protective coatings
Waterproofing Chemicals Comparison
One of the most common questions homeowners ask is: "Which waterproofing chemical is the best?" There is no universal answer. Each waterproofing material is designed for specific conditions. Choosing the wrong product may reduce effectiveness even if the application is technically correct. Professional waterproofing contractors select systems based on engineering requirements rather than product popularity.
| Waterproofing System | Best Application | Approximate Lifespan | Advantages | Limitations |
|---|---|---|---|---|
| Acrylic Coating | Terraces, external walls | 5–8 years | UV resistant, flexible, easy application | Moderate durability in heavy water exposure |
| Polyurethane (PU) | Roofs, terraces, balconies | 10–15 years | Highly flexible, excellent crack bridging, seamless finish | Higher cost and requires skilled application |
| Cementitious Waterproofing | Bathrooms, water tanks, internal wet areas | 8–12 years | Strong bond with concrete, ideal beneath tiles | Limited flexibility for moving structures |
| Bituminous Coating | Foundations, underground structures | 8–10 years | Good moisture resistance, economical | Poor UV resistance if left exposed |
| Crystalline Waterproofing | Basements, foundations, retaining walls | 15–20+ years | Becomes part of the concrete, self-seals micro cracks | Effective only with suitable concrete conditions |
| APP Membrane | Large terraces, commercial roofs | 12–15 years | Durable, excellent waterproof barrier | Torch application requires experienced installers |
| SBS Membrane | Roofs with thermal movement | 12–18 years | Superior flexibility in temperature variations | More expensive than conventional membranes |
| Epoxy Systems | Industrial floors, chemical exposure areas | 10–15 years | High chemical resistance and surface strength | Not ideal for areas with structural movement |
Contractor Insight
Professional contractors rarely choose waterproofing products based on brand names alone.
Instead, they evaluate:
- Surface condition
- Crack movement
- UV exposure
- Water pressure
- Building age
- Existing waterproof system
- Long-term maintenance expectations
The correct system is always more important than the most expensive product.
Repair vs Complete Re-Waterproofing: Which Is Better?
This is one of the most common questions homeowners ask after a leakage inspection. Many hope that small repairs will permanently solve the problem. Sometimes they can. Sometimes they cannot. The decision depends entirely on the condition of the existing waterproofing system.
When Localized Repair Is Usually Sufficient
Professional contractors may recommend targeted repairs when:
- Leakage is confined to a small area.
- Waterproofing has failed at one construction joint.
- Surface cracks are limited.
- The existing membrane remains largely intact.
- The waterproofing system is relatively new.
In these situations, repairing the affected area can restore performance without replacing the entire system.
When Complete Re-Waterproofing Is Recommended
A complete waterproofing system is generally advised when:
- Leakage occurs at multiple locations.
- Existing waterproof membranes have reached the end of their service life.
- Large sections have lost adhesion.
- Repeated repairs have already failed.
- Structural movement has damaged the existing system.
Although complete replacement involves a higher initial investment, it often proves more economical than carrying out repeated temporary repairs. Homeowners searching for waterproofing near me should arrange a professional inspection before deciding between repairs and complete re-waterproofing.
Why Waterproofing Before Interior Renovation Is Essential
Many homeowners schedule waterproofing after planning modular kitchens, wardrobes, false ceilings, and premium wall finishes. This sequence creates unnecessary risk. Once expensive interior work is installed, access to walls, slabs, and wet areas becomes far more difficult. Professional contractors therefore recommend completing all waterproofing before interior execution begins.
Waterproofing Protects Every Interior Investment
A properly waterproofed structure helps preserve:
- Premium wall finishes
- Decorative paint
- Wooden wardrobes
- Modular kitchens
- False ceilings
- Engineered flooring
- Electrical systems
- Interior décor
Skipping waterproofing may initially appear to reduce renovation costs, but future repairs often require dismantling completed interiors, resulting in significantly higher expenses.
Waterproofing Cost Framework
One of the first questions homeowners ask is: "How much will waterproofing cost?" There is no fixed answer because every property differs in terms of construction, leakage severity, treatment method, accessibility, and material selection. Professional waterproofing contractors in Thane estimate costs only after conducting a detailed site inspection. Instead of providing one lump-sum quotation, experienced contractors typically divide the budget into individual work categories.
| Waterproofing Area | Typical Cost Influencers |
|---|---|
| Terrace Waterproofing | Surface area, cracks, membrane type, accessibility |
| Bathroom Waterproofing | Tile removal, membrane system, plumbing condition |
| External Wall Waterproofing | Building height, crack repairs, coating type |
| Basement Waterproofing | Water pressure, repair method, structural condition |
| Roof Waterproofing | Roof type, drainage condition, membrane selection |
A detailed inspection provides the most accurate estimate and prevents unexpected cost variations during execution.
Typical Waterproofing Timeline
Although every project differs, professional waterproofing generally follows a structured sequence.
| Stage | Typical Activity |
|---|---|
| Day 1 | Site inspection and moisture assessment |
| Day 2–3 | Surface preparation and crack repairs |
| Day 4–5 | Waterproofing membrane application |
| Day 6 | Additional coating layers (if required) |
| Day 7–8 | Flood testing and quality inspection |
| Day 9 onward | Tile installation or finishing work after successful testing |
The exact timeline depends on the project size, weather conditions, curing requirements, and the waterproofing system selected.
How to Choose the Best Waterproofing Contractors in Thane
Searching online for "waterproofing contractors near me" usually produces dozens of companies offering similar promises.
Almost every contractor claims to provide:
- Permanent waterproofing
- Latest waterproofing chemicals
- Long warranties
- Affordable pricing
- Fast completion
From a homeowner's perspective, these companies often appear almost identical. However, professional waterproofing is not determined by marketing claims. It is determined by technical inspection, diagnosis, material selection, workmanship, and quality control. The best waterproofing contractors focus on solving the cause of leakage not simply covering visible damage.
Look for Inspection Before Quotation
One of the easiest ways to identify an experienced contractor is by observing how they prepare their quotation. Professional waterproofing companies rarely provide a final price after viewing only photographs or videos. Instead, they conduct a detailed inspection of the property.
During this inspection, they study:
- moisture movement
- crack patterns
- structural condition
- drainage
- previous waterproofing systems
- construction joints
- plumbing penetrations
Only after understanding the problem do they recommend a suitable waterproofing solution. If a contractor immediately recommends a chemical without inspecting the site, homeowners should ask additional questions before proceeding.
Evaluate the Diagnosis, Not Just the Product
Many homeowners ask: "Which waterproofing chemical will you use?" This is an important question. However, an even more important question is: "Why have you selected that waterproofing system?"
Professional contractors explain:
- where the leakage originates
- why it developed
- how water is travelling
- why a particular waterproofing system is appropriate
This explanation demonstrates technical understanding rather than product selling.
Ask About Surface Preparation
Waterproofing materials cannot compensate for poor preparation. Experienced contractors spend considerable time preparing the surface before applying any coating or membrane.
Surface preparation generally includes:
- removing loose concrete
- cleaning contaminants
- repairing cracks
- correcting damaged plaster
- checking slopes
- treating joints
A waterproofing system applied over an unstable surface will rarely provide long-term performance.
Verify Previous Projects
Experience matters because every waterproofing problem behaves differently.
Ask the contractor about projects involving:
- terrace waterproofing
- bathroom leakage
- basement waterproofing
- external wall seepage
- roof waterproofing
- apartment renovation
Contractors who regularly handle similar projects are usually better prepared to identify hidden issues. Comparing experienced waterproofing contractors near me based on inspection quality, workmanship, and technical expertise helps homeowners make informed decisions.

Questions Every Homeowner Should Ask Before Hiring
Choosing a waterproofing contractor becomes much easier when homeowners ask structured technical questions rather than focusing only on pricing. Below are some useful discussions to have before signing an agreement.
Questions About Inspection
Ask:
- What caused the leakage?
- How did you identify the source?
- Are there multiple leakage points?
- Can you show me the affected areas?
Professional contractors explain the diagnosis rather than simply recommending products.
Questions About Materials
Understand:
- Which waterproofing system will be used?
- Why is this system suitable?
- How long is the expected service life?
- Will the system remain exposed or be covered?
Understanding material behaviour helps homeowners make better long-term decisions.
Questions About Execution
Clarify:
- How will the surface be prepared?
- Will cracks be repaired first?
- Will flood testing be performed?
- How long is the curing period?
These questions reveal how structured the contractor's execution process is.
Questions About Quality Control
Ask:
- How is waterproofing tested?
- What inspections are performed?
- When will quality be verified?
- How is completion approved?
Professional waterproofing includes testing—not simply application.
Waterproofing Warranty Explained
Many homeowners believe every waterproofing warranty provides complete protection. Unfortunately, warranty documents are often misunderstood. Professional waterproofing warranties generally fall into two categories. Understanding the difference helps homeowners know exactly what is covered.
Product Warranty
A product warranty is provided by the manufacturer of the waterproofing material. It generally relates to the performance of the waterproofing product itself when used correctly.
However, it usually does not cover:
- poor surface preparation
- incorrect application
- structural movement
- construction defects
- drainage problems
Product warranties are valuable but should not be confused with workmanship guarantees.
Workmanship Warranty
A workmanship warranty is provided by the contractor responsible for installation.
It relates to:
- application quality
- execution standards
- workmanship defects
Professional contractors should clearly explain:
- warranty duration
- exclusions
- maintenance requirements
- claim procedure
Homeowners should always request written warranty documentation rather than relying on verbal assurances.
What Can Void a Waterproofing Warranty?
Even professionally installed waterproofing systems can lose warranty protection under certain conditions.
Examples include:
- drilling into waterproofed surfaces
- structural alterations
- unauthorized repairs
- poor maintenance
- blocked drainage causing prolonged water accumulation
Understanding these conditions helps preserve the waterproofing system throughout its expected lifespan.
Top 10 Waterproofing Mistakes Homeowners Make
Many waterproofing failures occur not because the products are poor, but because planning and execution are incomplete. Avoiding the following mistakes significantly improves long-term performance.
1. Waiting Until Leakage Becomes Visible
Waterproofing should begin when early warning signs appear, not after major damage develops.
2. Waterproofing After Interior Work
Completing waterproofing after wardrobes, flooring, and ceilings have been installed usually increases repair costs substantially.
3. Choosing Only the Cheapest Contractor
Low quotations often reduce:
- surface preparation
- inspections
- material quality
- workmanship
These savings usually become future repair expenses.
4. Ignoring Drainage Problems
Even excellent waterproof membranes cannot compensate for blocked or poorly designed drainage systems.
5. Applying New Coatings Over Failed Systems
- Layering new waterproofing over unstable existing coatings often leads to repeated failures.
- Proper diagnosis determines whether removal is necessary.
6. Skipping Flood Testing
- Testing confirms that the waterproofing system performs correctly before finishes are installed.
- Skipping this step increases project risk.
7. Ignoring Hairline Cracks
- Small cracks often become major leakage points during monsoon seasons.
- Early repair is considerably easier.
8. Assuming Tiles Are Waterproof
- Tiles provide decorative finishes.
- The waterproof protection exists beneath the tiles.
9. Using DIY Solutions for Major Leakage
- Small maintenance repairs may be manageable.
- However, structural leakage generally requires professional diagnosis and treatment.
10. Not Inspecting Waterproofing Periodically
- Routine inspections identify developing problems before significant damage occurs.
- Preventive maintenance is usually much less expensive than corrective repairs.
DIY Waterproofing vs Professional Waterproofing
Many waterproofing products are marketed directly to homeowners. While these products may be suitable for very small maintenance tasks, they are rarely adequate for significant leakage problems. Professional waterproofing differs in several important ways.
| DIY Waterproofing | Professional Waterproofing |
|---|---|
| Surface treatment | Root cause diagnosis |
| Limited inspection | Detailed technical inspection |
| Generic products | System selected for site conditions |
| Minimal testing | Flood testing and quality checks |
| No warranty | Product and workmanship support |
| Temporary improvement | Long-term protection |
DIY methods may hide symptoms temporarily. Professional waterproofing addresses the source of moisture.
Pre-Monsoon Waterproofing Checklist
Preventive inspections before the rainy season can significantly reduce emergency repairs. Homeowners should review the following areas annually.
Terrace
- Remove debris
- Clean drainage outlets
- Check surface cracks
- Inspect parapet joints
Bathroom
- Inspect grout
- Check silicone joints
- Observe damp patches
- Verify drainage
External Walls
- Inspect cracks
- Examine exterior paint
- Check window sealing
- Remove vegetation growth
Roof
- Clean outlets
- Inspect flashing
- Check waterproof coating
- Remove standing water
Waterproofing Contractor Hiring Checklist
Before appointing any waterproofing contractor in Thane, use the following checklist.
Inspection
- Detailed moisture inspection
- Source identification
- Crack assessment
- Drainage evaluation
Technical Planning
- Waterproofing system explained
- Surface preparation method
- Material specifications
- Flood testing procedure
Documentation
- Written quotation
- Scope of work
- Timeline
- Warranty
Execution
- Experienced technicians
- Proper equipment
- Quality inspections
- Final testing
Services We Offer
Conclusion: Waterproofing Is an Investment That Protects Every Other Investment
Home renovation is one of the largest investments most homeowners make. Naturally, attention is drawn to visible improvements such as elegant flooring, stylish kitchens, premium wardrobes, decorative ceilings, and carefully selected paint colours. However, none of these finishes can perform well if moisture continues entering the structure. Waterproofing creates the invisible foundation that protects every visible element of the renovation.
By preventing water penetration, it helps preserve structural integrity, improves indoor comfort, reduces maintenance costs, and extends the lifespan of interior finishes. Choosing experienced waterproofing contractors in Thane is therefore not simply about stopping leakage. It is about protecting your home, your renovation budget, and your long-term peace of mind.
The most successful waterproofing projects begin with detailed inspection, accurate diagnosis, appropriate material selection, disciplined execution, and thorough quality testing. When these steps are followed correctly, waterproofing becomes a long-term solution rather than a recurring repair.
Frequently Asked Questions
1. Why is waterproofing important before interior renovation?
Waterproofing prevents moisture from damaging walls, ceilings, flooring, wardrobes, modular kitchens, electrical systems, and decorative finishes. Completing waterproofing before interiors protects the entire renovation and reduces the likelihood of expensive repairs later.
2. Which areas of a home usually require waterproofing?
The most common areas include terraces, bathrooms, balconies, roofs, external walls, basements, water tanks, utility areas, and other locations exposed to rainwater or continuous moisture.
3. How do I know if my waterproofing has failed?
Common warning signs include damp patches, bubbling paint, peeling plaster, mold growth, musty odours, ceiling stains, swollen furniture, loose tiles, recurring seepage during monsoon, and white salt deposits on walls.
4. Which waterproofing system is best?
There is no single waterproofing system suitable for every situation. The correct solution depends on the location, water exposure, structural condition, and intended use. Professional contractors recommend systems such as acrylic, polyurethane, cementitious, crystalline, APP, or SBS membranes based on site conditions.
5. Can waterproofing be done without removing existing tiles?
In some situations, specialized injection grouting or surface treatments can reduce leakage without removing tiles. However, if the waterproof membrane beneath the tiles has failed extensively, removing the tiles and installing a new waterproofing system is often the most reliable long-term solution.
6. How long does waterproofing typically last?
The lifespan depends on the waterproofing material, exposure conditions, workmanship, and maintenance. Many professionally installed systems perform effectively for 8 to 20 years, while high-performance membrane systems may last even longer with regular inspections.
7. What is the difference between terrace waterproofing and roof waterproofing?
Terrace waterproofing generally focuses on accessible concrete terrace slabs that may also be used as outdoor spaces. Roof waterproofing is a broader term that includes flat roofs, sloped roofs, tiled roofs, and metal roofing systems, each requiring different treatment methods.
8. How much do waterproofing services cost in Thane?
The cost depends on factors such as the affected area, type of leakage, condition of the structure, waterproofing system selected, accessibility, and preparation work required. A detailed site inspection is necessary to provide an accurate quotation.
9. What should I look for when choosing waterproofing contractors in Thane?
Choose contractors who perform detailed site inspections, identify the source of leakage, explain the proposed waterproofing system, provide written quotations, conduct quality testing, and offer clear workmanship and product warranty information.
10. Is flood testing necessary after bathroom waterproofing?
Yes. Flood testing is one of the most important quality assurance procedures. It confirms that the waterproofing membrane performs correctly before floor and wall tiles are installed, helping prevent future leakage.
11. Can waterproofing permanently stop leakage?
When the root cause is correctly identified and the appropriate waterproofing system is professionally installed, waterproofing can provide long-term protection. However, future structural movement, new construction defects, or lack of maintenance may require additional repairs over time.
12. Does waterproofing increase property value?
Yes. A dry, well-maintained property is generally more attractive to buyers because it indicates lower maintenance requirements and better structural condition. Proper waterproofing also protects expensive interior finishes, improving the overall value of the home.
13. Should waterproofing be inspected regularly?
Yes. An annual inspection — especially before the monsoon is recommended. Early detection of small cracks, blocked drains, or coating damage allows minor repairs to be completed before major leakage develops.
14. Is DIY waterproofing recommended?
DIY waterproofing may be suitable for very small maintenance tasks, but significant leakage, structural seepage, terrace failures, bathroom waterproofing, and basement moisture should be handled by experienced professionals to ensure proper diagnosis and long-term performance.
15. Why should I hire local waterproofing contractors in Thane?
Local contractors are familiar with Thane's climate, heavy monsoon conditions, common residential construction methods, and recurring waterproofing challenges. Their local experience often helps them diagnose issues more accurately and respond more quickly during inspections and repairs.
You May be Interested in
-
 June 20,2025
Top 10 Office Cabin Interior Design Ideas & Trends
Leadership cabins are more than secluded workstations—they speak to authority, vision, and control.....
Read More... -
 June 13,2025
Small Office Interior Design Guide for Compact Workspaces
Setting up a compact office doesn’t have to be stressful. With smart small office interior design.....
Read More... -
 June 09,2025
The Complete Guide to Small Office and Cafe Interior Design
Explore expert tips on cafe interior design and small office interiors to create spaces that convert and inspire.....
Read More...
FREE CONSULTATION
Talk To Our Expert

About Us
Founded in 2016. Eagle Ventures has estabilished itself as one of the greatest and prestigious providers of construction focused interior renovation services and building.